Nobus Flexible Compute Service
Nobus Flexible Compute Service (FCS) is a web service that provides resizable compute capacity in the cloud. FCS enables creating Virtual Machines (VM) on-demand, as well as configuration of security and networking, and management of storage. Provide tools to build failure resilient applications by launching application instances in separate Availability Zone. Auto Scaling allows automatic scaling of the capacity up during demand spikes to maintain performance, and scales down during demand lulls to minimize costs. Flexible Load Balancing automatically distributes incoming application traffic across multiple FCS instances. Pay only for resources actually consumed, in instance-hours. Flexible capacity as low as ₦ 9,309.00 / Month .
Features of Nobus FCS
Nobus FCS provides the following features:
-
Virtual computing environments, known as instances
-
Several configurations of CPU, memory, storage, and networking capacity, known as Instance type
-
Preconfigured templates for your instances, known as Nobus Machine Images (NMIs).
-
Secure login details for your instances using key pairs
-
Storage volumes which behave like raw, unformatted block devices (FBS volumes).
-
Persistent network-attached Nobus FBS volumes (1 GB to 1 TB).
-
An Instance Snapshot preserves the disk state of a running instance.
-
Physical isolated location for resources, refered to as Availability Zones.
-
Firewall Especific protocols, and source IP ranges using security groups
-
Static IPv4 addresses for dynamic cloud computing (Flexible IP addresses).
-
Nobus cloud Logically isolated virtual networks (Data center as a Service).
Visit nobus cloud management dashboard to get started with Nobus FCS Console.
Helpful services
Use your eligible software licenses from vendors such as Microsoft and Oracle on Nobus FCS, so that you get the flexibility and cost effectiveness. See FCS Dedicated Hosting for more.
Nobus FCS resources can be provisioned directly using Nobus Cloud Orchestration Stacks. See Nobus Cloud Orchestration for more.
Maintain application availability and automatically add or remove instances according to conditions. See FCS Autoscaling for more.
Spread incoming application traffic across several instances automatically using Application Loadbalancer.
To import virtual machine (VM) or private images from your local environment into Nobus cloud, use FCS Compute Image Import/Export Service.
Nobus FCS Console
Access the Nobus FCS console by signing to the Nobus Management Dashboard. Click on Compute from Projects.
Nobus FCS Pricing
See Nobus FCS Pricing for a comprehensive list of charges. Visit the dashboard to see your bill or manage users. If you have questions, Contact Sales.
PCI DSS Compliance
Nobus FCS supports the processing, storage, and transmission of credit card data by a merchant or service provider.
Instances
An instance is a virtual server in the cloud. Several types of instances can be launched from a single Image or Nobus Machine Image (NMI). The hardware of the host computer which your instance use is determined by the instance types.
Important:Select an Instance type based on the workload to be attached to your instance. See Nobus FCS Instance Types.
You can interact with your instance same as any computer. You have total control and can use sudo to run root commands.
Security Best Practices
- Different security groups can be created for different requirements. Only open permissions that are needed.
- Control access by permitting only trusted networks or hosts to gain entry to ports.
Instance
Nobus FCS provides several flavors to enable you to select the CPU, memory, storage, and networking capacity required by your workload. Each instance is backed by Nobus FBS or Instance Store.
See FCS Instance Types for more information
Nobus FCS Instance is Pre-Billed at any given time.
See FCS Pricing for more information
Launching an Instance Options
| Field Name | Required | Details |
|---|---|---|
| Instance Name | Required | The name of the new instance, which becomes the initial host name of the server. If the server name is changed in the API or directly changed, the Dashboard names remain unchanged |
| Availability Zone | Required | The availability zone in which the image service creates the instance. Default availability zone is Nova. |
| Image | Required | Select a Nobus Machine Image |
| Flavor | Required | The vCPU, Memory, and Disk configuration. Select from the list of available flavors. |
| Instance Count | Required | If creating multiple instances with this configuration, enter an integer up to the number permitted by the quota, which is 10 by default. |
| Instance Boot Source | Required | Specify whether the instance will be based on an image or a snapshot. If it is the first time creating an instance, there will not yet be any snapshots available. |
| Image Name | Required | The instance will boot from the selected image. This option will be pre-populated with the instance selected from the table. However, choose Boot from Snapshot in Instance Boot Source, and it will default to Snapshot instead. |
| Security Groups | Optional | This option assigns security groups to an instance. The default security group activates you do not specify a customized group. Security Groups, similar to a cloud firewall, define which incoming network traffic enters or leaves an instance. |
| Keypair | Optional | Choose a key pair with this option. You can assign a single keypair to several instances. You can also create your own keypair if none is available. |
| Selected Networks | Optional | To add a network to an instance, click the + in the Networks field. |
| Customization Script | Optional | Specify a customization script. This script runs after the instance launches and becomes active. |
See FCS Quickstart for details on how to launch an instance
TOPICS
Types of Instance
Standard Instance Linux/Unix and Windows
Standard instances provide a balance of compute, memory, and networking resources, and can be used for a variety of workloads.
si.1.2.30.l, si.2.2.30.l, si.2.4.30.l, si.2.8.30.l, si.2.2.50.w, si.2.4.50.w, si.2.4.50.w, si.2.8.50.w instances are ideally suited for scale-out workloads that are supported by the Arm ecosystem. These instances are well-suited for the following applications:
Web servers
Containerized microservices
Caching fleets
Distributed data stores
Applications that require the Arm instruction set
si.4.4.30.l, si.4.8.30.l, si.4.16.30.l, si.4.32.30.l, si.4.4.50.w, si.4.8.50.w, si.4.16.50.w, si.4.24.50.w, and si.4.32.50.w instances provide an ideal cloud infrastructure, offering a balance of compute, memory, and networking resources for a broad range of applications that are deployed in the cloud. well-suited for the following applications:
Web and application servers
Small and medium databases
Caching fleets
Running backend servers for SAP, Microsoft SharePoint, cluster computing, and other enterprise applications
si.8.16.30.l, si.8.32.30.l, si.8.16.50.w, and si.8.32.50.w instances provide your applications with direct access to physical resources of the host server, such as processors and memory. These instances are well suited for the following:
- Workloads that require access to low-level hardware features that are not available or fully supported in virtualized environments
- Applications that require a non-virtualized environment for licensing or support
si.8.64.30.l, si.16.64.30.l, si.8.64.50.w and si.16.64.50.w instances provide a baseline level of CPU performance with the ability to burst to a higher level when required by your workload. An Unlimited instance can sustain high CPU performance for any period of time whenever required. For more information, see These instances are well-suited for the following applications:
- Websites and web applications
- Code repositories
- Development, build, test, and staging environments
- Microservices
Also available: Compute Optimized, Storage Optimized, GPU Instance,
For advance information about the hardware specifications for each Nobus FCS instance type, see Nobus FCS Instance Types.
Access and Security Configuration
If you are yet to sign up for Nobus, or require support to launch your first instance, do the following below:
You can start using Nobus FCS immediately if signed up already.
STEPS
Sign Up for a Nobus Account
Your Nobus account has access to all services in Nobus after you sign up for Nobus, and you are only billed for the services that you use.
To create a Nobus account
You would receive a mail as part of the sign up requirement. Ensure that all instructions are followed. Provide the verification code sent as part of the email confirmation message and 2FA.
Please ensure that you have completed all the sign up requirement.
Quickstart Guide
You can set up and configure the operating system and applications that run on your instance using Nobus FCS.
Launch and Manage an Instance
Example with Linux Instances
Important: Ensure that you've completed the Access and Security Configurationprocedure for Nobus FCS.
You can view the status of the launch. Although it take a few minute to load, view the status information in the Status column. At instance launch the initial state is build. When you start the instance, it enters running state and receives a public DNS name.
You can launch an instance from the following sources:
- Images uploaded to the Image service.
- Image that you have copied to a persistent volume.
- Instance snapshot.
- Volume snapshot
To launch an instance using the Nobus Management Console
- Log in to the Nobus Cloud Console
On the Project tab, open the Compute tab and click Instances
The dashboard shows the instances with its name, its private and floating IP addresses, size, status, task, power state, and so on.

Click Launch Instance.
In the Launch Instance dialog box, specify the following values:
Details tab

Instance Name
Assign a name to the virtual machine.
Note:The name you assign here becomes the initial host name of the server.
Description
You can assign a brief description of the virtual machine.
Availability Zone
By default
novaImportant: If you select an availability zone and plan to use the 'boot from volume' option in the Source step, make sure that the availability zone you select for the instance is the same availability zone where your bootable volume resides.
Instance Count
To launch multiple instances with same configurations, enter a value greater than
1The default is1Instance Boot Source
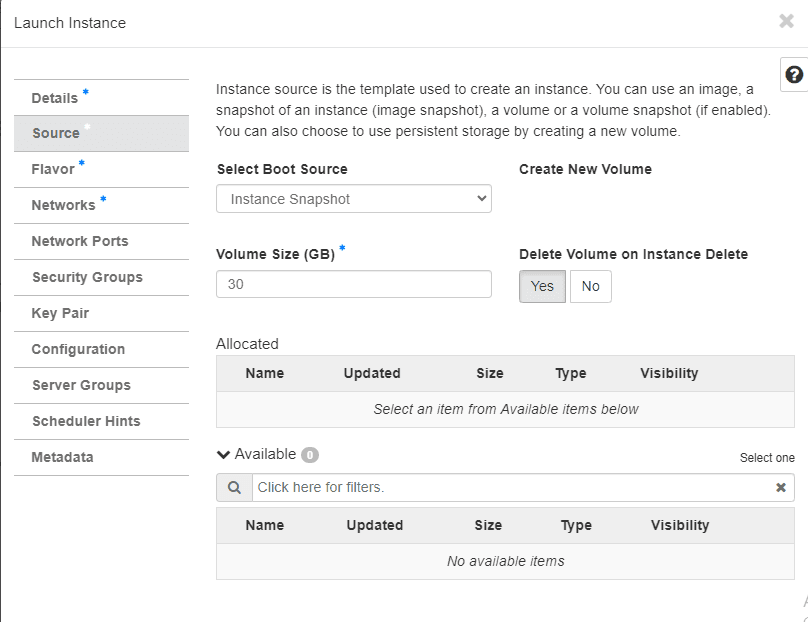
Instance source is the template used to create an instance. You can use an image, a snapshot of an instance (image snapshot), a volume or a volume snapshot (if enabled). You can also choose to use persistent storage by creating a new volume.
Your options are:
If you want to create an instance that uses ephemeral storage, meaning the instance data is lost when the instance is deleted, then choose one of the following boot sources:
1. Boot from image
This option uses an image to boot the instance.
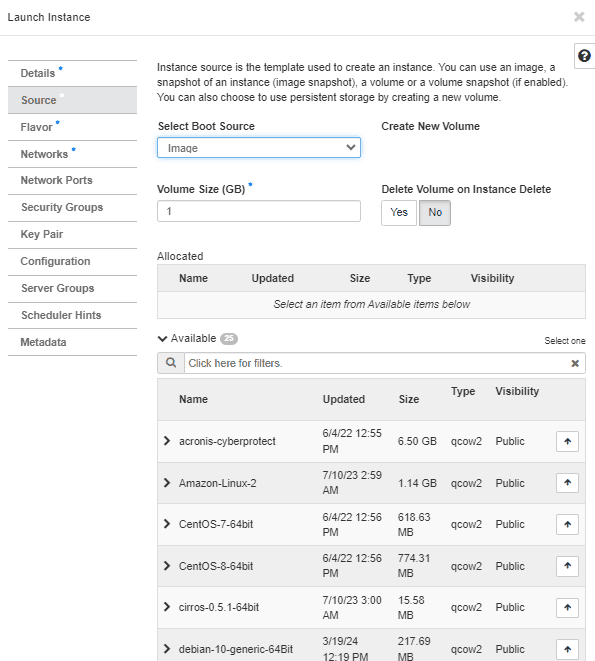
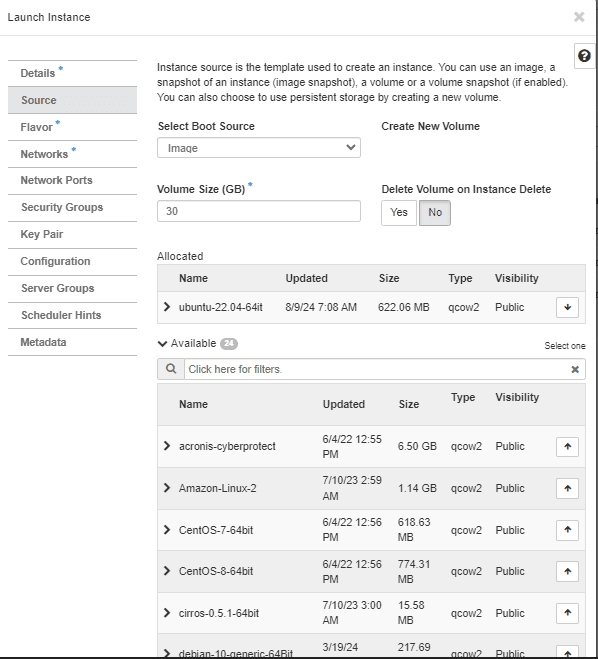
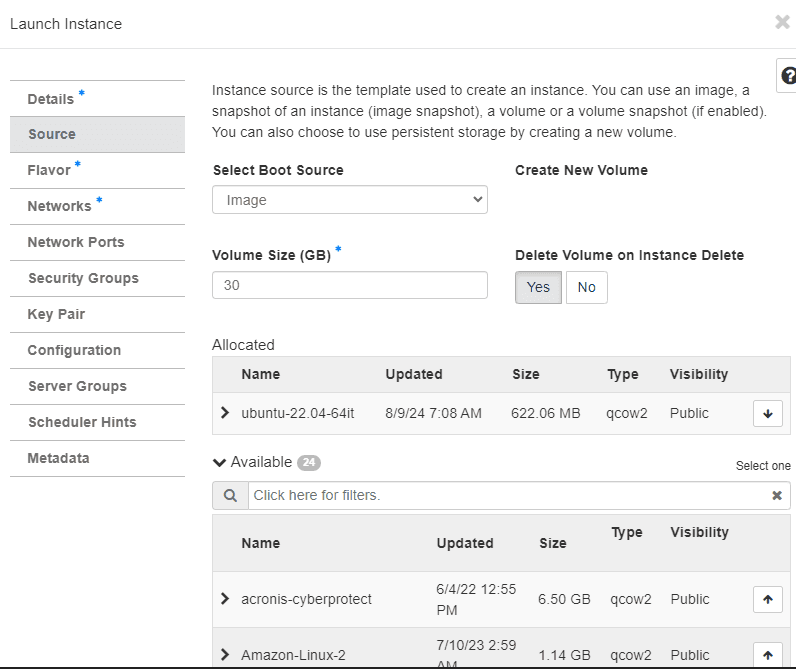
If you choose this option, a new field for Image Name displays. You can select the Ubuntu-22.04-64bit image from the list.
Add the Volume size by entering e.g 30 (meaning 30GB volume).
2. Boot from Instance snapshot
This option uses an instance snapshot to boot the instance. A snapshot is an image which preserves the disk state of a running instance
If you choose this option, a new field for Instance Snapshot displays. You can select the snapshot from the list and specify a volume size
If you want to create an instance that uses persistent storage, meaning the instance data is saved when the instance is deleted, then select one of the following boot options:
1. Boot from volume
This field changes based on your previous selection. If you have chosen to launch an instance using a volume, the Volume field displays.
To boot from existing volume, select the volume name from the dropdown list.
See FBS Volume quickstart for a comprehensive documentation on how to create a volume.
3. Boot from volume snapshot (create a new volume from existing snapshot)
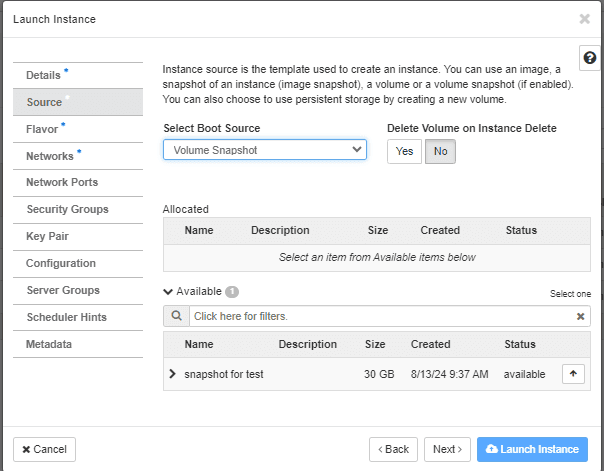
Using this option, you can boot from a volume snapshot and create a new volume. Goto Volumes tab, choose Snapshot. Click on the Actions dropdown menu. Select Create Volume.
In the Create Volume window, enter a name for the new volume. Click Create Volume, thenClose. You can then select the new volume as the boot source for your instance.
Instance Type tab
Spec
Specify the size of the instance to launch.
Select si.2.4.30l from the list
Note
The spec is selected based on the size of the image selected for launching an instance if you choose to boot from image.
See FCS Instance Types for a instance types.
Networks tab
Selected Networks
To add an existing network to the instance, scroll down to the Networks section. Select the Network or Network Portfrom the dropdown list.
Security Groups tab
Security Groups
Activate the security groups that you want to assign to the instance. Security groups are a kind of cloud firewall that define which incoming network traffic is forwarded to instances.
If you have not created a custom security group, you can assign the default security group to the instance. The default security group allows all incoming traffic from other instances that are assigned to the same security group, but it does not allow any incoming traffic from outside the cloud.
To allow incoming traffic from outside the cloud, you must create a custom security group and add rules to allow the desired traffic.
See Security Group and Rules Reference for a comprehensive documentation.
Key Pair tab
Key Pair
Specify a key pair.
From the keypair dropdown, choose an existing key pair, then select the key pair that you created when setting up.
Alternatively, you can create a new key pair at launch from the instance launch window.
To create a new keypair, Select Create a new key pair, enter a name for the key pair, and then choose Create Keypair . This is the only chance for you to save the private key file, so be sure to select Copy private key to clipboard . Open Notepad or any editor and paste. Save the private key file with the (.pem) extention in a safe place. click "Close" . Remember that you'll need to provide the name of your key pair when you launch an instance and the corresponding private key each time you connect to the instance.
Configuration tab
Customization Script Source
Specify a customization script that runs after your instance launches.
Metadata tab
Available Metadata
Add Metadata items to your instance.
Click Launch Instance.
To launch your instance
If you did not provide a key pair, security groups, or rules, users can access the instance only from inside the cloud through VNC. Even pinging the instance is not possible without an ICMP rule configured.
Connect to your instance by using SSH
To use SSH to connect to your instance, use the downloaded keypair file.
You can't connect to your instance unless you have launch it with a key pair for which you have the .pem file. You must also attach a security group that allows SSH access from whitelisted IP Address(es).
See Connecting to Your FCS Instance for a comprehensive documentation.
Copy the IP address for your instance.
Use the ssh command to make a secure connection to the instance. For example:
- At the prompt, type
yes.
Track usage for instances
You can track usage for instances for each project. You can track costs per month by showing meters like number of vCPUs, disks, RAM, and uptime for all your instances.
Log in to the dashboard.
You can track usage for instances through the Overview section of the dashboard.
To query the instance usage for a month, select a month and click Submit .
To download a summary, click Download CSV Summary.
Create an instance snapshot
Log in to the dashboard.
On the Project tab, open the Compute tab and click the Instances category.
Select the instance from which to create a snapshot.
In the actions column, click Create Snapshot.
In the Create Snapshot dialog box, enter a name for the snapshot, and click Create Snapshot.
The Images category shows the instance snapshot.
To launch an instance from the snapshot, select the snapshot image and clickLaunch. Proceed with launching an instance.
Manage an instance
Log in to the dashboard.
On the Project tab, open the Compute tab and click Instances category.
Select an instance.
In the menu list in the actions column, select the state.
You can resize or rebuild an instance. You can also choose to view the instance console log, edit instance or the security groups. Depending on the current state of the instance, you can pause, resume, suspend, soft or hard reboot, or terminate it.
Instance Types tab
Spec
Specify the size of the instance to launch.
Note
The instance type is selected based on the size of the image selected for launching an instance.
See Connecting to Your FCS Instance for a comprehensive documentation.
Best Practices
Security and Networking
User management
Use Nobus Identity Service to create, distribute, change, and revoke Nobus access credentials. A credential is a data that confirms the identity of the user. (It could be a user name and password, user name and API key, or an authentication token that the Identity service provides).
Protect your root user login details, keys and access tokens like you would your credit card numbers or any other sensitive secret.
You are adviced to use your account email address and password to sign in to the Nobus Management Console and create a user for yourself with administrative permissions. Please ensure that you use a strong password to help protect account-level access to the Nobus Management Console and Don't share your Nobus account root user password or access keys with anyone. It must be kept private.
Create Individual Users
Don't use your Nobus account root user credentials to access Nobus, and don't give your credentials to anyone else. Instead, create individual users for anyone who needs access to your Nobus account. Create an user for yourself as well, give that user administrative permissions, and use that user for all your work.
Before you set permissions for individual users, though, see the next point about groups.
Grant Least Privilege
Follow the standard security advice of granting least privilege, or granting only the permissions required to perform a task. Determine what users (and roles) need to do and then craft policies that allow them to perform only those tasks.
Start with a minimum set of permissions and grant additional permissions as necessary. Doing so is more secure than starting with permissions that are too lenient and then trying to tighten them later.
Configure a Strong Password Policy for Your Users
If you allow users to change their own passwords, require that they create strong passwords and that they rotate their passwords periodically. You can use the password policy to define password requirements, such as minimum length, whether it requires non-alphabetic characters, how frequently it must be rotated, and so on.
Remove Unnecessary Credentials
Remove user credentials (passwords and keys) that are not needed. For example, if you created an user for an application that does not use the console, then the user does not need a password. Similarly, if a user only uses the console, remove their access keys. Passwords and access keys that have not been used recently might be good candidates for removal. You can find unused passwords or access keys using the console.
Security Groups for Instances
A security group acts as a virtual firewall that controls the traffic for one or more instances. When you launch an instance, you can specify one or more security groups; otherwise, we use the default security group. You can add rules to each security group that allow traffic to or from its associated instances. You can modify the rules for a security group at any time; the new rules are automatically applied to all instances that are associated with the security group. When we decide whether to allow traffic to reach an instance, we evaluate all the rules from all the security groups that are associated with the instance.
When you launch an instance in a Data center, you must specify a security group that's created for that Data center. After you launch an instance, you can change its security groups. Security groups are associated with network interfaces. Changing an instance's security groups changes the security groups associated with the primary network interface (eth0).
If you have requirements that aren't met by security groups, you can maintain your own firewall on any of your instances in addition to using security groups.
Security Group Rules
The rules of a security group control the inbound traffic that's allowed to reach the instances that are associated with the security group and the outbound traffic that's allowed to leave them.
The following are the characteristics of security group rules:
- By default, security groups allow all outbound traffic.
- Security group rules are always permissive; you can't create rules that deny access.
- Security groups are stateful — if you send a request from your instance, the response traffic for that request is allowed to flow in regardless of inbound security group rules. For Data center security groups, this also means that responses to allowed inbound traffic are allowed to flow out, regardless of outbound rules.
- You can add and remove rules at any time. Your changes are automatically applied to the instances associated with the security group.
- When you associate multiple security groups with an instance, the rules from each security group are effectively aggregated to create one set of rules. We use this set of rules to determine whether to allow access.Note:
You can assign multiple security groups to an instance, therefore an instance can have hundreds of rules that apply. This might cause problems when you access the instance. We recommend that you condense your rules as much as possible.
For each rule, you specify the following:
Protocol: The protocol to allow. The most common protocols are 6 (TCP) 17 (UDP), and 1 (ICMP).
Port range: For TCP, UDP, or a custom protocol, the range of ports to allow. You can specify a single port number (for example,
22), or range of port numbers (for example,7000-8000).ICMP type and code: For ICMP, the ICMP type and code.
Source or destination: The source (inbound rules) or destination (outbound rules) for the traffic. Specify one of these options:
An individual IPv4 address. You must use the
/32prefix length; for example,203.0.113.1/32.An individual IPv6 address. You must use the
/128prefix length; for example2001:db8:1234:1a00::123/128.A range of IPv4 addresses, in CIDR block notation, for example,
203.0.113.0/24.A range of IPv6 addresses, in CIDR block notation, for example,
2001:db8:1234:1a00::/64.The prefix list ID for the NCS service; for example,
pl-1a2b3c4d. For more information, see Gateway Data center Endpointsin the Nobus Data center User Guide.Another security group. This allows instances associated with the specified security group to access instances associated with this security group. This does not add rules from the source security group to this security group. You can specify one of the following security groups:
The current security group
A different security group for the same Data center
A different security group for a peer Data center in a Data center peering connection
- (Optional) Description: You can add a description for the rule; for example, to help you identify it later. A description can be up to 255 characters in length. Allowed characters are a-z, A-Z, 0-9, spaces, and ._-:/()#,@[]+=;!$*.
When you specify a security group as the source or destination for a rule, the rule affects all instances associated with the security group. Incoming traffic is allowed based on the private IP addresses of the instances that are associated with the source security group (and not the public IP or Elastic IP addresses). If your security group rule references a security group in a peer Data center, and the referenced security group or Data center peering connection is deleted, the rule is marked as stale.
If there is more than one rule for a specific port, we apply the most permissive rule. For example, if you have a rule that allows access to TCP port 22 (SSH) from IP address 105.0.113.1 and another rule that allows access to TCP port 22 from everyone, everyone has access to TCP port 22.
Connection Tracking
Your security groups use connection tracking to track information about traffic to and from the instance. Rules are applied based on the connection state of the traffic to determine if the traffic is allowed or denied. This allows security groups to be stateful — responses to inbound traffic are allowed to flow out of the instance regardless of outbound security group rules, and vice versa. For example, if you initiate an ICMP ping command to your instance from your home computer, and your inbound security group rules allow ICMP traffic, information about the connection (including the port information) is tracked. Response traffic from the instance for the ping command is not tracked as a new request, but rather as an established connection and is allowed to flow out of the instance, even if your outbound security group rules restrict outbound ICMP traffic.
Not all flows of traffic are tracked. If a security group rule permits TCP or UDP flows for all traffic (0.0.0.0/0) and there is a corresponding rule in the other direction that permits all response traffic (0.0.0.0/0) for all ports (0-65535), then that flow of traffic is not tracked. The response traffic is therefore allowed to flow based on the inbound or outbound rule that permits the response traffic, and not on tracking information.
In the following example, the security group has specific inbound rules for TCP and ICMP traffic, and an outbound rule that allows all outbound traffic.
| Inbound rules | ||
| Protocol type | Port number | Source IP |
| TCP | 22 (SSH) | 203.0.113.1/32 |
| TCP | 80 (HTTP) | 0.0.0.0/0 |
| ICMP | All | 0.0.0.0/0 |
| Outbound rules | ||
| Protocol type | Port number | Destination IP |
| All | All | 0.0.0.0/0 |
TCP traffic on port 22 (SSH) to and from the instance is tracked, because the inbound rule allows traffic from 203.0.113.1/32 only, and not all IP addresses (0.0.0.0/0). TCP traffic on port 80 (HTTP) to and from the instance is not tracked, because both the inbound and outbound rules allow all traffic (0.0.0.0/0). ICMP traffic is always tracked, regardless of rules. If you remove the outbound rule from the security group, then all traffic to and from the instance is tracked, including traffic on port 80 (HTTP).
An existing flow of traffic that is tracked may not be interrupted when you remove the security group rule that enables that flow. Instead, the flow is interrupted when it's stopped by you or the other host for at least a few minutes (or up to 5 days for established TCP connections). For UDP, this may require terminating actions on the remote side of the flow. An untracked flow of traffic is immediately interrupted if the rule that enables the flow is removed or modified. For example, if you remove a rule that allows all inbound SSH traffic to the instance, then your existing SSH connections to the instance are immediately dropped.
For protocols other than TCP, UDP, or ICMP, only the IP address and protocol number is tracked. If your instance sends traffic to another host (host B), and host B initiates the same type of traffic to your instance in a separate request within 600 seconds of the original request or response, your instance accepts it regardless of inbound security group rules, because it’s regarded as response traffic.
To ensure that traffic is immediately interrupted when you remove a security group rule, or to ensure that all inbound traffic is subject to firewall rules, you can use a network ACL for your subnet — network ACLs are stateless and therefore do not automatically allow response traffic.
Default Security Groups
Your NCS account automatically has a default security group for the default Data center in each Region. If you don't specify a security group when you launch an instance, the instance is automatically associated with the default security group for the Data center.
A default security group is named default, and it has an ID assigned by NCS. The following are the default rules for each default security group:
Allows all inbound traffic from other instances associated with the default security group (the security group specifies itself as a source security group in its inbound rules)
Allows all outbound traffic from the instance.
You can add or remove inbound and outbound rules for any default security group.
You can't delete a default security group. If you try to delete a default security group, you see the following error: Client.CannotDelete: the specified group: "sg-51530134" name: "default" cannot be deleted by a user.
Custom Security Groups
If you don't want your instances to use the default security group, you can create your own security groups and specify them when you launch your instances. You can create multiple security groups to reflect the different roles that your instances play; for example, a web server or a database server.
When you create a security group, you must provide it with a name and a description. Security group names and descriptions can be up to 255 characters in length, and are limited to the following characters:
a-z, A-Z, 0-9, spaces, and ._-:/()#,@[]+=&;!$*
A security group name cannot start with sg-. A security group name must be unique for the Data center.
The following are the default rules for a security group that you create:
- Allows no inbound traffic
- Allows all outbound traffic
After you've created a security group, you can change its inbound rules to reflect the type of inbound traffic that you want to reach the associated instances. You can also change its outbound rules.
For more information about the rules you can add to a security group, see Security Group Rules Reference
Working with Security Groups
You can create, view, update, and delete security groups and security group rules using the Nobus FCS console.
Creating a Security Group
You can create a custom security group using the Nobus FCS console. You must specify the Data center for which you're creating the security group.
To create a new security group using the console
Open the Nobus Management Dashboard.
choose Security Groups.
Choose Create Security Group.
Specify a name and description for the security group.
For Data center, choose the ID of the Data center.
You can start adding rules, or you can choose Createto create the security group now (you can always add rules later). For more information about adding rules, see Adding Rules to a Security Group.
The Nobus FCS console enables you to copy the rules from an existing security group to a new security group.
To copy a security group using the console
Open the Nobus FCS console at Nobus Management Dashboard.
In the navigation pane, choose Security Groups.
Select the security group you want to copy, chooseActions, Copy to new.
The Create Security Group dialog opens, and is populated with the rules from the existing security group. Specify a name and description for your new security group. For Data center, choose the ID of the Data center. When you are done, choose Create.
You can assign a security group to an instance when you launch the instance. When you add or remove rules, those changes are automatically applied to all instances to which you've assigned the security group.
After you launch an instance, you can change its security groups. For more information, see Changing an Instance's Security Groups.
Describing Your Security Groups
You can view information about your security groups using the Nobus FCS console or the command line.
To describe your security groups using the console
Open the Nobus FCS console at Nobus Management Dashboard.
In the navigation pane, choose Security Groups.
(Optional) Select Data center ID from the filter list, then choose the ID of the Data center.
Select a security group. We display general information in theDescription tab, inbound rules on theInbound tab, outbound rules on theOutbound tab, and tags on theTags tab.
Adding Rules to a Security Group
When you add a rule to a security group, the new rule is automatically applied to any instances associated with the security group after a short period.
For more information about choosing security group rules for specific types of access, see Security Group Rules Reference.
To add rules to a security group using the console
Open the Nobus FCS console at Nobus Management Dashboard.
In the navigation pane, choose Security Groups and select the security group.
On the Inbound tab, choose Edit.
In the dialog, choose Add Rule and do the following:
For Type, select the protocol.
If you select a custom TCP or UDP protocol, specify the port range in Port Range.
If you select a custom ICMP protocol, choose the ICMP type name from Protocol, and, if applicable, the code name from Port Range.
For Source, choose one of the following:
Custom: in the provided field, you must specify an IP address in CIDR notation, a CIDR block, or another security group.
Anywhere: automatically adds the
0.0.0.0/0IPv4 CIDR block. This option enables all traffic of the specified type to reach your instance. This is acceptable for a short time in a test environment, but it's unsafe for production environments. In production, authorize only a specific IP address or range of addresses to access your instance.Note:If your security group is in a Data center that's enabled for IPv6, the Anywhere option creates two rules—one for IPv4 traffic (
0.0.0.0/0) and one for IPv6 traffic (::/0).My IP: automatically adds the public IPv4 address of your local computer.
For Description, you can optionally specify a description for the rule.
For more information about the types of rules that you can add, see Security Group Rules Reference.
Choose Save.
You can also specify outbound rules. On theOutbound tab, choose Edit,Add Rule, and do the following:
For Type, select the protocol.
If you select a custom TCP or UDP protocol, specify the port range in Port Range.
If you select a custom ICMP protocol, choose the ICMP type name from Protocol, and, if applicable, the code name from Port Range.
For Destination, choose one of the following:
Custom: in the provided field, you must specify an IP address in CIDR notation, a CIDR block, or another security group.
Anywhere: automatically adds the
0.0.0.0/0IPv4 CIDR block. This option enables outbound traffic to all IP addresses.Note:If your security group is in a Data center that's enabled for IPv6, the Anywhere option creates two rules—one for IPv4 traffic (
0.0.0.0/0) and one for IPv6 traffic (::/0).My IP: automatically adds the IP address of your local computer.
For Description, you can optionally specify a description for the rule.
Choose Save.
Updating Security Group Rules
When you modify the protocol, port range, or source or destination of an existing security group rule using the console, the console deletes the existing rule and adds a new one for you.
To update a security group rule using the console
Open the Nobus FCS console at Nobus Management Dashboard.
In the navigation pane, choose Security Groups.
Select the security group to update, and choose Inbound Rules to update a rule for inbound traffic orOutbound Rules to update a rule for outbound traffic.
Choose Edit. Modify the rule entry as required and choose Save.
Deleting Rules from a Security Group
When you delete a rule from a security group, the change is automatically applied to any instances associated with the security group.
To delete a security group rule using the console
Open the Nobus FCS console at Nobus Management Dashboard.
In the navigation pane, choose Security Groups.
Select a security group.
On the Inbound tab (for inbound rules) or Outbound tab (for outbound rules), choose Edit. Choose Delete (a cross icon) next to each rule to delete.
Choose Save.
Deleting a Security Group
You can't delete a security group that is associated with an instance. You can't delete the default security group. You can't delete a security group that is referenced by a rule in another security group in the same Data center. If your security group is referenced by one of its own rules, you must delete the rule before you can delete the security group.
To delete a security group using the console
Open the Nobus FCS console at Nobus Management Dashboard.
In the navigation pane, choose Security Groups.
Select a security group and choose Actions, Delete Security Group.
Choose Yes, Delete.
Connecting to Your FCS Instance
Your nobus fcs instance are managed using a terminal and ssh. You'll need to have an SSH client and, optionally, a SSH key pair. Clients generally authenticate either using passwords (which are less secure and not recommended) or SSH keys (which are very secure and strongly recommended).
For you to log in to your FCS Instance with SSH, you need the; IP address, default username on the server and SSH private key that was downloaded if SSH key is not being used, the default password for that username must be provided.
At time of instance creation, your public key is automatically added to the SSH authorized keys list. In case you chose to upload your own public keys, see Adding ssh keys to your nobus account.
By default root-user login is disabled on all servers. We recommend using only your private key to login. Ensure to secure your private key file.
When your FCS Instance has been created, you can copy the IP address from the of your instance from the IP Address column in compute tab by clicking on the cloud config panel in the Nobus Management dashboard.
The default username is ubuntu for Ubuntu Linux and centos for CentOS. You can connect to the FCS Instance using your preferred SSH client or command line.
TOPICS
Connect to Your MacOS or Linux Instance
Follow these steps to connect to your instance.
Connect to Your Instance Via Openssh on MacOS or Linux
Connect to your fcs instance through an opened terminal on linux or MacOS. If you are on Windows you can install the Windows Subsystem for Linx (WSL) to access the power of a full Ubuntu terminal environment on Windows or see Connecting to your windows instance
You will use your instance IP address to securely connect with the instance through your terminal. Copy the IP address and then run the following command in your terminal to securely connect with your Droplet via SSH as a root user.
First: To make the key pair known to SSH, run the ssh-add command.
To SSH, For multiple SSH keys, specify the path to your private key using the -i flag. Run the command:
At first log in, the server isn't known to your localhost, so you'll be prompted if you're sure you want to continue connecting. The terminal will then display a message like this:
The authenticity of host '190.988.33.2 (190.988.33.2)' can't be established. ECDSA key fingerprint is SHA256:+Mx4ID5k4N8H7R24y+APZAoTe69hmAh9qMawyf/Lq9U. Are you sure you want to continue connecting (yes/no/[fingerprint])?
Type yes. If you chose a passphrase when setting up SSH, you will be prompted to enter it here. If everything is working, you will then be logged into your instance as a user.
You may receive a remote host identification warning:
@@@@@@@@@@@@@@@@@@@@@@@@@@@@@@@@@@@@@@@@@@@@@@@@@@@@@@@@@@@ @ WARNING: REMOTE HOST IDENTIFICATION HAS CHANGED! @ @@@@@@@@@@@@@@@@@@@@@@@@@@@@@@@@@@@@@@@@@@@@@@@@@@@@@@@@@@@ IT IS POSSIBLE THAT SOMEONE IS DOING SOMETHING NASTY! Someone could be eavesdropping on you right now (man-in-the-middle attack)! It is also possible that a host key has just been changed. The fingerprint for the ECDSA key sent by the remote host is SHA256:uvbiwhb85hdPiZPc1FOZp4s30O1TGzVjsh6IGkmK8CM. Please contact your system administrator.This happens most often when you've destroyed a FCS Instance immediately before creating and trying to connect to a new one. If the new FCS Instance gets assigned the same IP address as the FCS Instance that was destroyed, the host key of the old server is stored and conflicts with the new host key
If this happens, you can delete the old FCS Instance's host key from your local system with the command ssh-keygen -R server_ip and then reconnect.
This is followed by an authentication. If you've already added SSH keys (and the optional key passphrase), you can now establish a secure connection to the FCS Instance.
Connect to Your Instance Via PuTTY on Windows
You can connect to a Windows or Linux server using PuTTY, by first converting the Nobus FCS .pem private key file to a .ppk file using PuTTYgen:
1. Download and Install PuTTY and PuTTYgen:
- Download PuTTY and PuTTYgen from the official PuTTY website (https://www.putty.org/).
- Install both applications on your local machine
2. Convert the .pem private key file to .ppk format using PuTTYgen:
- Open PuTTYgen.
- Click "Load" and navigate to the location of your .pem private key file.
- Select the .pem file and click "Open".
- PuTTYgen will display the public key information. Click "Save private key" to save the file in .ppk format.
- Choose a location to save the .ppk file and click "Save".
3. Connect to your Windows or Linux server using PuTTY:
- Open PuTTY.
- In the "Host Name (or IP address)" field, enter the public DNS or IP address of your Nobus FCS instance.
- In the "Connection type" section, select "SSH".
- In the left-hand menu, navigate to "Connection" - "SSH" - "Auth"
- Click "Browse" and navigate to the .ppk file you saved earlier.
- Click "Open" to establish the connection.
4. Authenticate and connect to your server:
- If prompted, enter the username for your server. The default username for an Ubuntu instance is "ubuntu".
- PuTTY will connect to your server, and you should be presented with a command prompt.
That's it! You have now successfully connected to your Windows or Linux server using PuTTY, after converting the Nobus FCS .pem private key file to a .ppk file using PuTTYgen.
Autoscaling Guide
Nobus FCS Auto Scaling helps you maintain application availability and allows you to automatically add or remove FCS instances according to conditions you define. You can use the fleet management features of FCS Auto Scaling to maintain the health and availability of your fleet. You can also use the dynamic and predictive scaling features of FCS Auto Scaling to add or remove FCS instances.
Dynamic scaling responds to changing demand and predictive scaling automatically schedules the right number of FCS instances based on predicted demand ensuring that your application always has the right amount of compute, while proactively provisioning capacity. Dynamic scaling and predictive scaling can be used together to scale faster.
FCS Auto Scaling can scale across purchase options to optimize performance and cost. Nobus FCS Auto Scaling is enabled by NOBUS and carries no additional fees. Nobus FCS Fee and Nobus service fees apply and are billed separately.
FCS Autoscaling Features
Automatically scale in and out
Launch new Nobus FCS instances seamlessly and automatically when demand increases, and terminate Nobus FCS instances not needed automatically and save money when demand subsides.
Choose when and how to scale
Scale dynamically based on your Nobus metrics or predictably according to a schedule that you define. Receive notifications to be alerted when you use Nobus alarms to initiate Nobus FCS Auto Scaling actions, or when FCS Auto Scaling completes an action.
Fleet management
Automating how your Nobus FCS fleet is managed can help maintain the availability of your applications. Nobus FCS Auto Scaling will automatically replace unhealthy or unreachable instances to maintain higher availability of your applications. To automate fleet management for FCS instances, FCS Auto Scaling monitors the health of running instances, automatically replaces impaired instances, and balances capacity across Availability Zones.
Predictive Scaling
Predictive Scaling, predicts future traffic, including regularly-occurring spikes, and provisions the right number of FCS instances in advance of predicted changes. Predictive Scaling’s machine learning algorithms detect changes in daily and weekly patterns, automatically adjusting their forecasts. This removes the need for manual adjustment of Auto Scaling parameters over time, making Auto Scaling simpler to configure and consume. Auto Scaling enhanced with Predictive Scaling delivers faster, simpler, and more accurate capacity provisioning resulting in lower cost and more responsive applications.
Support for multiple purchase models, instance types, and more
Nobus FCS Auto Scaling lets you provision and automatically scale instances across purchase options, Availability Zones (AZ), and instance families in a single application to optimize scale, performance, and cost.
Included with Nobus FCS
If you’re signed up for the Nobus FCS service, you’re already registered to use Nobus FCS Auto Scaling and can begin using the feature via the management dashboard.
How FCS Autoscaling Works
Fleet Management
Whether you are running one Nobus FCS instance or thousands, you can use Nobus FCS Auto Scaling to detect impaired Nobus FCS instances and unhealthy applications, and replace the instances without your intervention. This ensures that your application is getting the compute capacity that you expect. Nobus FCS Auto Scaling will perform three main functions to automate fleet management for FCS instances:
1. Monitor the health of running instances
Nobus FCS Auto Scaling ensures that your application is able to receive traffic and that FCS instances are working properly. Nobus FCS Auto Scaling periodically performs health checks to identify any instances that are unhealthy.
2. Replace impaired instances automatically
When an impaired instance fails a health check, Nobus FCS Auto Scaling automatically terminates it and replaces it with a new one. That means that you don’t need to respond manually when an instance needs replacing.
3. Balance capacity across Availability Zones
Nobus FCS Auto Scaling can automatically balance instances across zones, and always launches new instances so that they are balanced between zones as evenly as possible across your entire fleet.
Scheduled Scaling
Scaling based on a schedule allows you to scale your application ahead of known load changes. For example, every week the traffic to your web application starts to increase on Wednesday, remains high on Thursday, and starts to decrease on Friday. You can plan your scaling activities based on the known traffic patterns of your web application.
Dynamic Scaling
Nobus FCS Auto Scaling enables you to follow the demand curve for your applications closely, reducing the need to manually provision Nobus FCS capacity in advance. For example, you can use target tracking scaling policies to select a load metric for your application, such as CPU utilization. Or, you could set a target value using the new “Request Count Per Target” metric from Application Load Balancer, a load balancing option for the Elastic Load Balancing service. Nobus FCS Auto Scaling will then automatically adjust the number of FCS instances as needed to maintain your target.
Predictive Scaling
Predictive Scaling, a feature of Nobus Auto Scaling uses machine learning to schedule the right number of FCS instances in anticipation of approaching traffic changes. Predictive Scaling predicts future traffic, including regularly-occurring spikes, and provisions the right number of FCS instances in advance. Predictive Scaling’s machine learning algorithms detect changes in daily and weekly patterns, automatically adjusting their forecasts. This removes the need for manual adjustment of Auto Scaling parameters as cyclicality changes over time, making Auto Scaling simpler to configure. Auto Scaling enhanced with Predictive Scaling delivers faster, simpler, and more accurate capacity provisioning resulting in lower cost and more responsive applications.
Getting Started with FCS Autoscaling
See Nobus CloudOrchestration Kit for comprehensive documentation.
Step 1: Sign into the Nobus Management Dashboard
Sign into the management dashboard and click on the cloud config panel button.
Step 2: Create an Nobus FCS Auto Scaling group
Go through the ochestration tab, using the Nobus FCS Auto Scaling stack, create the launch configuration.
Step 3: Configure your Nobus FCS Auto Scaling group
Specify a name, size, and network for your Nobus FCS Auto Scaling group.
Step 5: Configure Scaling Policies (Optional)
You can also configure scaling policies for your Nobus FCS Auto Scaling group.
Dedicated hardware to support existing software licenses
Nobus FCS Dedicated Hosts allow you to use your eligible software licenses from vendors such as Microsoft and Oracle on Nobus FCS, so that you get the flexibility and cost effectiveness of using your own licenses, but with the resiliency, simplicity and flexibility of Nobus. An Nobus FCS Dedicated Host is a physical server fully dedicated for your use, so you can help address corporate compliance requirements.
Nobus FCS Dedicated Host is also integrated with Nobus License Manager, a service which helps you manage your software licenses, including Microsoft Windows Server and Microsoft SQL Server licenses. In License Manager, you can specify your licensing terms for governing license usage, as well as your Dedicated Host management preferences for host allocation and host capacity utilization. Once setup, Nobus takes care of these administrative tasks on your behalf, so that you can seamlessly launch virtual machines (instances) on Dedicated Hosts just like you would launch an FCS instance with Nobus provided licenses.
Contact technical support to start managing your Dedicated Hosts.
Benefits
Save money on licensing costs
Dedicated Hosts allow you to use your existing per-socket, per-core, or per-VM software licenses, including Windows Server, SQL Server, SUSE Linux Enterprise Server, Red Hat Enterprise Linux, or other software licenses that are bound to VMs, sockets, or physical cores, subject to your license terms. This helps you to save money by leveraging your existing investments. Learn more about your Windows licensing options.
Help meet corporate compliance requirements
Some organizations need to run their instances on dedicated servers instead of multi-tenant servers. With Dedicated Hosts, you get a physical server that is dedicated for your use. Dedicated Hosts provide visibility and the option to control how you place your instances on a specific, physical server. This enables you to deploy instances using configurations that help address corporate compliance and regulatory requirements.
Automatic host maintenance with scheduling control
Offload undifferentiated heavy-lifting of host maintenance onto Nobus to reduce your operational burden, while controlling your maintenance event schedules to suit your business’s operational needs. In the rare event of a host degradation, or for planned maintenances, Nobus will automatically move the FCS instances running on your affected host to a newly allocated dedicated host to ensure your workload’s high availability.